

- 4 mins
First things first—most patterns are drafted for a B cup. But let’s be real, most of us aren’t a standard B cup! And just to keep us on our toes, a “B cup” in sewing isn’t the same as a bra brand’s B cup. Sewing patterns use ‘dressmaker’s cup sizes’—a whole different kettle of thread! So, let’s break down how to figure out your ideal cup size for making clothes that fit like a dream.
So, how do you know how big (or small) your bust dart should be?
Let’s stitch this step-by-step! (Assuming you’ve already got your bodice pattern, whether self-drafted or shop-bought.)
Step 1: Measure Up
Grab your best-fitting bra and get some help if you can—it’s much easier when the tape measure stays parallel to the floor!
- Underbust measurement: Right where your bra underwire sits
- Full bust measurement:** Around the fullest part of your bust.
Step 2: Calculate the Difference
Subtract the underbust from the full bust measurement.
> E.g., 34” (full bust) – 32” (underbust) = 2” difference
Step 3: Work Out Dart Width
- -Dart width (on the front bodice side seam) = 25%of the difference above
- Using our example: 2” x 0.25 = **0.5” dart width
Step 4: Determine Dart Length
- For wearing, darts should stop about 1–2 inches before the bust point (apex)
- For drafting, draw the dart legs all the way to the apex—this makes it easier if you want to reposition the dart later.
Step 5: Draw and Balance
- Draw two dart legs from your dart width measurement out to the apex
- The front and back side seams need to end up the same length after sewing
- If you adjust the dart, also adjust the side seam length to match the back!
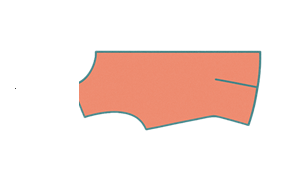
Step 6: Fold and True the Dart
- Fold the dart just as you would before stitching (darts are generally folded down or outward)
- Align the folded front side seam to the back pattern’s side seam
- Mark where to add or trim to even up the seam—add paper if it’s short, trim the back if needed
- Use a pinwheel marker to trace along the side seam while the dart is folded. Unfold, redraw the seam, and voilà -matching dart legs!
Pinwheel marker
I recommend this Clover 3-in-1 tracing wheel. You can use this interchangeably for marking patterns AND carbon marking.
As an Amazon Associate, I may earn a small commission from qualifying purchases—rest assured, I only ever recommend products I truly use and love in my own sewing adventures.

References
I've done all the scrolling for you, and I LOVE Jin's tutorials, so I'm not going to reinvent the wheel. Here's a link to the video that will provide a visual for you.
A final round of applause
A big round of applause for taking this step! Make your toile, tweak your fit, and sew up your perfectly fitted masterpiece.
Happy sewing!
Want first dibs on our latest blogs, tips, and all things stitchy?
Want to be the first to know when our latest blogs go live? Pop your details in below and we’ll send a little sewing inspiration straight to your inbox as soon as it’s hot off the (virtual) press. Stay in the loop—never miss a stitch!